
Windows 11 is a powerful operating system with many features and capabilities that can greatly enhance your computing experience. From enabling dark mode to organizing your work using virtual desktops, many tips and tricks can help you make the most of Windows 11.
Microsoft released its latest desktop operating system, Windows 11, on October 5, 2021, with an updated interface, innovative features, and improvements to existing features. It has several new and improved features to enhance user experience and productivity. We have covered some of the Windows 11 tricks and tips in this blog.
1. Voice Typing for Efficient Transcription
Voice typing is a new feature in Windows 11 that allows users to type with their voice instead of the traditional keyboard input. This feature is particularly useful for people with mobility or dexterity issues and those who prefer to dictate their text instead of typing it manually.
- To use voice typing in Windows 11, users must open any app that accepts text input, such as Microsoft Word or Notepad.
- Then, they can activate the feature by pressing the Windows key + H keyboard shortcut.
- You can also try clicking on the microphone icon on the touch keyboard.
- Once activated, users can start dictating their text, and Windows 11 will transcribe their speech into text.
Voice typing also supports voice commands for editing and formatting text, such as “bold,” “underline,” or “delete the last word.
2. Pause Windows Updates to Avoid Issues
Windows Updates are essential for keeping your computer secure and up-to-date, but they can also be disruptive, especially when they happen at inconvenient times. Windows 11 has a new feature that allows users to pause updates for up to six months, giving them more control over when and how they install updates.
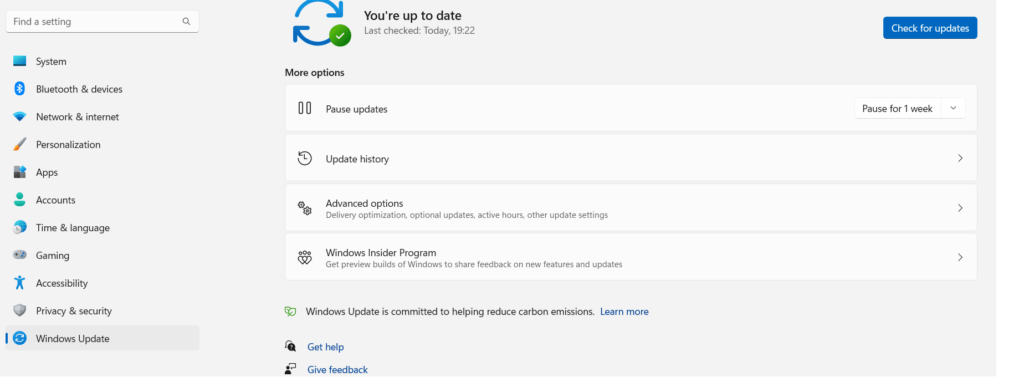
- To pause Windows 11, users need to go to Settings > Windows Update > Advanced Options and click “Pause Updates.”
- They can then choose how long they want to pause updates, up to six months.
It’s worth noting that pausing updates for too long can leave your computer vulnerable to security threats and prevent you from accessing new features and improvements.
3. Show Taskbar on All Displays for Easy Access and Control
Windows 11 allows users to show the taskbar on multiple displays, making switching between apps and managing windows on different screens easier.
To show the taskbar on multiple displays in Windows 11, users need to go to Settings > Personalization > Taskbar and turn on the “Show taskbar on all displays” option.
With this feature enabled, users can see the taskbar on all their connected displays and move apps and windows between screens more easily. Depending on their preferences, they can also choose to show or hide certain icons on the taskbar on each display.
4. Visible Classic Right-click Menu on Windows 11
Windows 11 has an improved right-click menu that shows only the most frequently used options. However, you can access the previous menu on your PC by right-clicking on File Explorer and choosing the option that says “Show more options” or by using the shortcut key Shift + F10.
5. Use Widgets to Stay Up-to-date
Are you always on the lookout for the latest updates and information on the go? Well, Windows 11 has got you covered with its handy Widgets feature that allows you to stay up-to-date with your favorite news, sports, and entertainment sources.
Widgets are small, customizable windows that sit on your desktop and display real-time information from various sources. To access Widgets on Windows 11, simply click on the Widgets icon located on the taskbar, and a panel will pop up displaying the latest news and updates.
Widgets can be customized to show only the information that you’re interested in. To do this, click on the three dots at the top right corner of the Widgets panel, and then click on “Edit Widgets.” Here you can choose which widgets to add or remove, and even rearrange them in order of importance.
Widgets are not only limited to news and updates. You can also use them to keep track of your calendar events, monitor your system’s performance, and even control your smart home devices.
6. Enable Autocorrect for error-free writing
Are you someone who often makes spelling mistakes while typing on your Windows 11 device? Well, worry no more! Windows 11 has a built-in Autocorrect feature that can help you write error-free.
Autocorrect is a feature that automatically corrects spelling mistakes as you type. It works by comparing the words you type to a dictionary of correctly spelled words, and if it detects an error, it suggests a correction. Enabling Autocorrect on Windows 11 is simple.
First, open the Settings app on your Windows 11 device and click on “Devices.” From there, select “Typing” from the left-hand side menu. Under “Typing,” you will see an option for “Autocorrect misspelled words.” Toggle this option on, and you’re all set!
You can also customize your Autocorrect settings by clicking on the “Spelling” section under “Type” in the Settings app. Here you can choose the language you want to use, add or remove words from your dictionary, and even turn off Autocorrect for specific apps.
Autocorrect is an excellent feature that can save you time and prevent embarrassing spelling mistakes in your work or personal communication. It’s especially useful for non-native English speakers or those who struggle with spelling.
7. Enable Dark Mode in Windows 11
Dark Mode is a feature that changes the color scheme of your Windows 11 interface from light to dark, reducing the amount of blue light emitted by your device. This can help reduce eye strain and improve sleep quality, especially if you work on your device for extended periods.
Enabling Dark Mode on Windows 11 is simple.
- First, click on the Start button and select “Settings” (gear icon) from the left-hand side menu.
- From there, click on “Personalization” and select “Colors” from the left-hand side menu.
- Under “Choose your color,” you will see an option for “Choose your default app mode.”
- Select “Dark” from the drop-down menu, and voila! Your Windows 11 interface will now be in Dark Mode.

You can also choose to enable Dark Mode for specific applications by selecting “Apps” under “Choose your color” and then toggling on the option for “Choose a default app mode.” From there, you can select which apps you want to enable Dark Mode for.
8. Use Virtual Desktops to Keep Your Work Organized
Are you tired of cluttered desktops and struggling to keep your work organized on your Windows 11 device? Well, worry no more! Windows 11 comes with a Virtual Desktop feature that can help you keep your work organized and increase productivity.
Virtual desktops allow you to create multiple desktops that can be customized for different You can switch between these desktops easily, just like you would switch between different windows on a single desktop. This can help you keep your work separate, reduce distractions, and improve your focus.
Enabling Virtual Desktops on Windows 11 is easy. First, click on the Task View button on your taskbar, which is located next to the Start button. From there, you can click on the “New Desktop” button in the top left corner to create your virtual desktop.
Once you have multiple desktops, you can easily switch between them by clicking on the Task View button again and selecting the desktop you want to switch to. You can also move windows between desktops by clicking and dragging them to the desired desktop.
9. Clean up your storage
Windows 11 comes with a built-in feature called StorageSense, which can help you free up space on your device by automatically deleting unnecessary files and content. You can also customize the settings to suit your needs.
To enable Storage Sense, navigate to the Start menu and click on the Settings icon (the gear icon). From there, click on “System” and then “Storage.” Under “Storage sense,” toggle the switch to “On.” You can also tap on “Configure Storage Sense or run it now” to customize the settings further.
In the Storage Sense settings, you can choose how often to run the feature, which files to delete, and which folders to exclude. For example, you can choose to delete temporary files, empty the recycle bin, and remove files in the downloaded folder that haven’t been used for a certain number of days.
10. Adjust your privacy
Now, let’s move on to adjusting your privacy settings in Windows 11. Windows 11 has a range of privacy settings that allow you to control how your device collects and uses your personal data.
To adjust your privacy settings, go to the Start menu and click on the Settings icon. From there, click on “Privacy & Security” and then “Privacy.” Here, you will see a range of options to control your privacy settings, such as controlling app permissions, controlling which apps can access your microphone or camera, and controlling your location settings.
You can also adjust your general privacy settings by clicking on “General” under “Privacy & Security.” Here, you can control your advertising ID, limit diagnostic data, and control which apps can run in the background.
Conclusion
Whether you’re a beginner or a power user, these tips and tricks can help you become more productive and efficient in your daily work. So why not try some of these Windows 11 tips and tricks today and see how they can transform your computing experience? With a little bit of tweaking and customization, you can unlock the full potential of Windows 11 and enjoy a seamless and enjoyable computing experience for years to come.